Lab 9 - LabVIEW Programming
University of California at Berkeley
Donald A. Glaser Physics 111A
Instrumentation Laboratory
Lab 9
LabVIEW Programming
©2015 by the Regents of the University of California. All rights reserved.
LabVIEW Basics I Interactive tutorial installed with LabVIEW
LabVIEW Lecture Review the LabVIEW PowerPoint Lecture “Modern Experimental Practice.ppt” available in the \BSC Share\LAB_9 folder on the 111A Lab computers' U drive (U:) \\nas.ls.berekeley.edu\111lab
Art of Electronics, Horowitz & Hill Chapter 13.
Physics 111-Lab Library Reference Site
Reprints and other information can be found on the Physics 111 Library Site.
In this lab you will learn how to acquire data using LabVIEW, and use your knowledge to investigate Johnson Noise.
Before coming to class complete this list of tasks:
- Completely read this Lab Write-up
- Answer the pre-lab questions utilizing the references and this write-up
- Perform any circuit calculations use MatLab or anything that can be done outside of lab use RStudio (freeware).
- Begin and if possible complete programming tasks in this lab write-up
- Plan out how to perform Lab exercises in this write-up.
- All parts spec sheets are located on the Physics 111 Library site.
Prelab
1. What are the properties of a good data acquisition environment?
2. At room temperature, what would be the RMS noise across a 100k resistor sampled between 1kHz and 10kHz?
3. What is the predicted gain of the circuit used in Exercise 9.4?
Several LabVIEW programs are used in this lab. Some of these programs do not use data acquisition hardware and can be run on your own computer. Information about downloading LabVIEW on your personally-owned computers can be found here:https://inst.eecs.berkeley.edu/~inst/ni/students/
All LabVIEW programs used that do not require the data acquisition hardware can be downloaded from http://instrumentationlab.berkeley.edu/labviewprograms. The following files are included:
- Noisy Signal Generator.vi & Noisy Signal Generator.exe
- Visual Noise.vi & Visual Noise.exe
If you run the original VIs you will have full privileges to examine and edit the LabVIEW code. If you run the executable, you will not be able to examine or edit the code.
The “LabVIEW Basics I: Introduction” (LVB1) interactive tutorial will be used to introduce LabVIEW programming. The tutorial is installed on the lab computers, and can also be installed on your personal computer along with LabVIEW and completed at home.
You will demonstrate your new programming skills by completing selected exercises from an NI training course, found here: U:\BSC Share\LAB_9\LabVIEW 2016 Training Excercises.pdf. Most (but not all) of the exercises do not require the data acquisition hardware, and can be done on your own computer. Additional training exercises that were developed for LabVIEW 2012 might be useful, and can be found at U:\BSC Share\LabView Training.
NOTE: if you receive the hardware error -50152 while working in LabVIEW, reboot the computer to resolve the error.
Background
Data Sources
Originally, physicists made measurements by hand; we measured lengths with rulers, counted events by penciling in tick marks, and timed events with stopwatches. But as the experiments became more sophisticated, hand and eye techniques failed; they were too slow, too inaccurate, and too imprecise. Experiments began making measurements electronically. In some experiments, the measurements are intrinsically electrical; for instance:
- Measurements of the charge collected on a plate from a cosmic ray.
- Measurements of the resistance of a semiconductor.
- Measurements of the radio signal from a pulsar.
- Measurements of the potential across a nerve cell.
Other experiments produced data that is not intrinsically electrical, but are best measured by converting the data to an electrical signals. Devices which convert a non-electrical measurements to an electrical signal are called transducers, and some typical examples include:
- A spectral line converted to an electrical signal by a photomultiplier tube.
- The passage of an energetic particle converted to an electrical signal in a spark chamber.
- The separation between two masses in a gravity wave experiment measured by light interferometry and converted to an electrical signal with a photocell.
- The temperature of a liquid helium bath converted to an electrical signal by measuring the resistance of a semiconductor.
- The pressure in vacuum chamber measured with an ion gauge.
Perhaps the last important non-electrical observations were photographs of astronomical images, and particle tracks in bubble chambers. Now even astronomical “photos” are taken electronically with CCD cameras, and bubble chambers have been replaced by silicon detectors.
Computerized Data Acquisition
For many decades, it was sufficient to read the signal on a meter, or display the signal on an oscilloscope. Sometimes hybrid methods were used; for my Ph.D. thesis, I took about ten thousand photographs of oscilloscope screens, and analyzed the information on the photos with calipers. Nowadays, most data is collected by computer. Computers have become astonishingly powerful, and data acquisition hardware has become cheap, fast and accurate. Data acquisition by computer has many advantages over hand collection:
- It is generally more precise and accurate.
- The much larger data sets that can be collected by computers are far more amenable to sophisticated analysis techniques.
- It is much less tedious.
- When properly programmed, there are no recording errors.
Noise, Signal Processing, and Data Acquisition
Unfortunately, it’s a rare experiment that produces noise-free data. Noise comes from many sources. Some are intrinsic, like the Johnson Noise discussed later in these Background notes, while others are extrinsic, like the 60Hz harmonics picked up from the power lines. It is always best to minimize noise before collecting data, but inevitably we would like to “see into the noise”…to recover a valid signal from a noisy signal. Powerful signal processing techniques, like filtering, averaging and Fourier Transforms, have been developed to do this. Most of these techniques require extensive data sets. Frequently, computerized data acquisition is the only way to acquire enough data.
Data Acquisition Devices
Modern instruments like oscilloscopes, signal sources, and digital multimeters can often send their measurements to computers. The most common hardware interface protocol is called the GPIB bus, sometimes known as the HP-IB or IEEE bus. Powerful in its time, the GPIB interface is slow, expensive, difficult to use, and archaic. Recently, some instruments have been designed to communicate over Ethernet or USB. Whatever the bus, each instrument has its own set of programming commands, and recovering data from the instrument is generally painful.
Standalone instruments are often the best choice for very high end applications, but many applications are well served by data acquisition cards placed inside standard computers. These cards are quite cheap and powerful, and can be much easier to use than standalone devices.
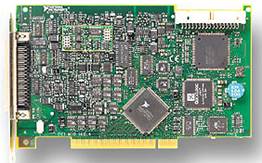
The data acquisition card in the 111 lab computers.
Data Acquisition Environments
Standalone instruments can be used independently via their front panel interfaces, but data acquisition cards must be used in a data acquisition environment. Most cards come with a debugging interface that may be used in as a simple data logger, but is insufficient for more sophisticated applications. Ideally, the data acquisition environment should be:
· Flexible.
· Powerful.
· Easy to learn, use, and debug.
· Self-documenting.
· Robust and stable (doesn’t crash.)
· Efficient (uses computer resources wisely.)
Some familiar programs provide data acquisition environments. For instance, with add-ins, Excel can be used to collect data, but it has very limited functionality, execrable graphs, is utterly undocumentable, and is inefficient. Add-ins are available for both Mathematica and Matlab, and both produce beautiful graphs. Matlab, in particular, has powerful data analysis capability. But their data acquisition functionality is limited, both are obscure and difficult to learn, have pathetic, 1970’s style user interfaces, and Mathematica is inefficient.
Most data acquisition cards also come with windows DLLs that can be called by C and C++ . Properly programmed, C and C++ are efficient and powerful data acquisition environments. But they are very primitive, have neither built-in graphing capability or analysis routines, and are difficult to learn and debug. Both can be documented, but, in the press of time, rarely are.
National Instruments, has developed a quirky graphical programming language called LabVIEW specifically designed for data acquisition, analysis and control. It is easy to learn and use, powerful and flexible, efficient, and self-documenting. It resembles no other significant computer language. You develop a user interface, or Front Panel[l2]
You will learn to write LabVIEW programs in this lab. It should be fun and useful to you outside this course; almost all the physics labs in Berkeley, and many throughout the world, have adopted LabVIEW as their programming standard, and LabVIEW is widely used in industry.
LabVIEW is not a panacea; for simple tasks it is unsurpassed, but, like any programming language, programming complicated applications is difficult. While LabVIEW does not resemble other languages, many of the programming guidelines you may have learned previously still apply: breaking functionality down into subroutines, testing subroutines individually, avoiding side effects like global variables, paying attention to memory management, and using efficient data structures are always worthwhile.
Johnson Noise
In 1928, J.B. Johnson discovered that the RMS voltage across an isolated resistor is not zero, but, instead, fluctuates in proportion to the square root of the temperature and resistance. Later that year, H. Nyquist showed that the voltage is due to the thermal fluctuations in the resistors, and follows:
![]() ,
,
where R is the resistance, T is the temperature, and ![]() is Boltzmann’s constant. The bandwidth B is the band over which one measures the voltage. In other words, if the signal from the resistor is sent through a bandpass filter which passes frequencies between
is Boltzmann’s constant. The bandwidth B is the band over which one measures the voltage. In other words, if the signal from the resistor is sent through a bandpass filter which passes frequencies between ![]() and
and ![]() , the bandwidth is
, the bandwidth is ![]() .
.
The discovery and explanation of Johnson Noise, sometimes called Thermal Noise or Nyquist Noise, was one of the grand triumphs of thermodynamics. It is well worth reading Johnson’s and Nyquist’s original papers, which are available on the lab computers under “U:\BSC Share\LAB_9\”.
Johnson Noise is of great practical importance; it is often the dominate source of noise in an experimental measurement. Normally noise is detrimental and an annoyance, but measuring the noise in a resistor is probably the easiest way to determine ![]() . We will perform this measurement in this lab.
. We will perform this measurement in this lab.
In the lab
Problem 9.1 - Discerning signals in the presence of noise.
Load the program Noisy Signal Generator.vi. Set the Noise Level to 0, and run the program. (Enter values into the Noise Level control by left clicking inside the box and typing a number, by left clicking on the arrow indicator ![]() on the left side of the box, or by left clicking on the box and using the up and down arrows. Run the program by left clicking the run
on the left side of the box, or by left clicking on the box and using the up and down arrows. Run the program by left clicking the run ![]() button and stop it by left clicking on the stop sign
button and stop it by left clicking on the stop sign ![]() or by left clicking on the Stop button.)
or by left clicking on the Stop button.)
This program generates several hundred cycles of a 100Hz, 1V RMS sine wave. The first four cycles of the wave are displayed in the top graph, and its spectrum in the bottom graph.
Now increase the Noise Level. This adds Gaussian noise with the specified standard deviation to the sine wave. Notice how the wave is impossible to discern directly when the noise is greater than ten, but is nonetheless easy to discern in the spectrum.
Further increase the noise to around forty. The spectral signal will have faded into the noise. If you didn’t already know where to find the signal, you would not be able to identify it.
Now click the Continuously Regenerate Noise button, which will display the signal with a new noise set every 50ms. Your brain will average the instances, and the signal will become identifiable again.
Finally, click the Averaging On button. This will average the spectrum, with exponentially decreasing weighting,[1] over the number of spectrums specified by the Averaging Depth control. Play with different Averaging Depths and Noise Levels, and see how small a signal you can see. Summarize your observations in your lab book.
Problem 9.2
Properly programmed computers are generally better than humans at discerning signals in the presence of noise; for example, the spectral analysis in 9.1 was much more informative than the display of the unprocessed waveform. Occasionally, however, humans are better than computers, particularly when we have a well-informed notion of what the signal should look like. Take advantage of this fact when appropriate, always being aware that it is very easy to fool yourself.[2]
Humans are particularly good at facial recognition in the presence of noise. Load the program Visual Noise.vi. This program displays eight iconic portraits corrupted by noise. Images can be changed with the Picture # control, and the noise level changed with the Noise Level control. When the picture is first displayed, the noise will be set to 200, and the image will be unrecognizable. For each of the images, lower the noise in decrements of ten (200, 190, 180, etc.) until you recognize the image. Typically, you will need to lower the noise to below 150.
a) For images 1 and 2, sit close to the computer.
b) For images 3 and 4, sit close to the computer, but switch on “Continuously Regenerate Noise.” As described in 9.1, this is equivalent to averaging the signal.
c) For images 5 and 6, at each noise level, look at the screen from at least two meters away. Do not continuously regenerate the noise. Because the pixels blur when observed at a distance, this is equivalent to low pass filtering the signal. Bandwidth reduction is one of the most important signal processing techniques.
d) For images 7 and 8, continuously regenerate the noise, and look at the screen from far away. You should find that you can discern remarkably noisy images.
Summarize your observations in your lab book.
 Problem 9.3 - LabVIEW programming
Please find the following pdf file: U:\BSC Share\LAB_9\LabVIEW 2016 Training Exercises.pdf
Learn to program in LabVIEW by working through the interactive tutorial referenced above. This can be done on the lab computers or on your own time outside of the lab if you install LabVIEW on your personal machine.
Develop your LabVIEW programming skills by completing the exercises in the aforementioned pdf. While you may work with your partner, both of you will be expected to learn to program in LabVIEW separately.
Demonstrate the programs you created in the Exercises to the TA’s and discuss any confusing parts of the tutorial.
Note: The file LabVIEW_Debugging_Tools.pdf contains explainations of a number of debugging tools that will be helpful to use when debugging your programs. Additionally, further (slightly out of date) training exercises that were developed for LabVIEW 2012 might be useful, and can be found at U:\BSC Share\LabView Training.
Johnson Noise
The following exercises find Boltzmann’s constant via the measurement of Johnson Noise. Johnson noise is not large: for a resistance of 1Mohm, and a bandwidth of 100kHz, the room temperature noise level is about 40mV. Consequently, we need to build an amplifier to observe the noise.
Problem 9.4
Build the circuit shown in the schematic below. Verify the component values and build a very neat circuit. The ratios of R1/R2 and R3/R4 are very important
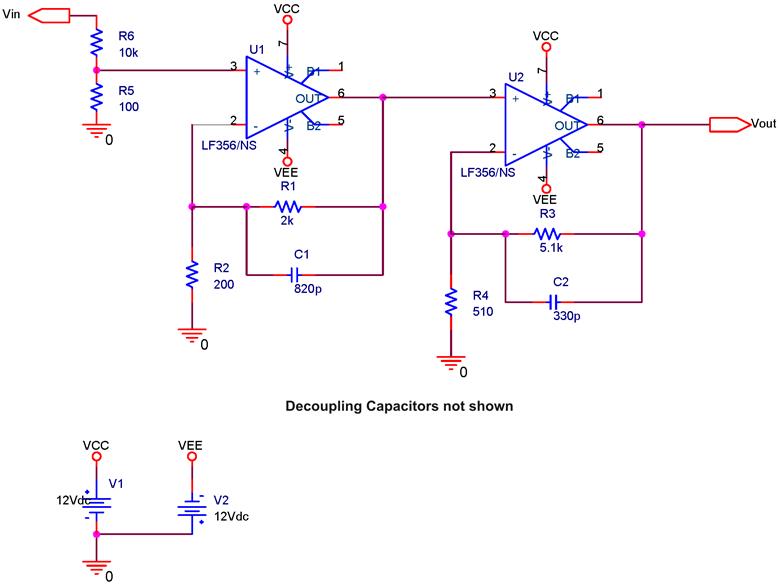
Debug the circuit with a 1kHz, 0.1V signal connected to the voltage divider. If you are having noise issues try moving the circuit to another location on your breadboards
Problem 9.5
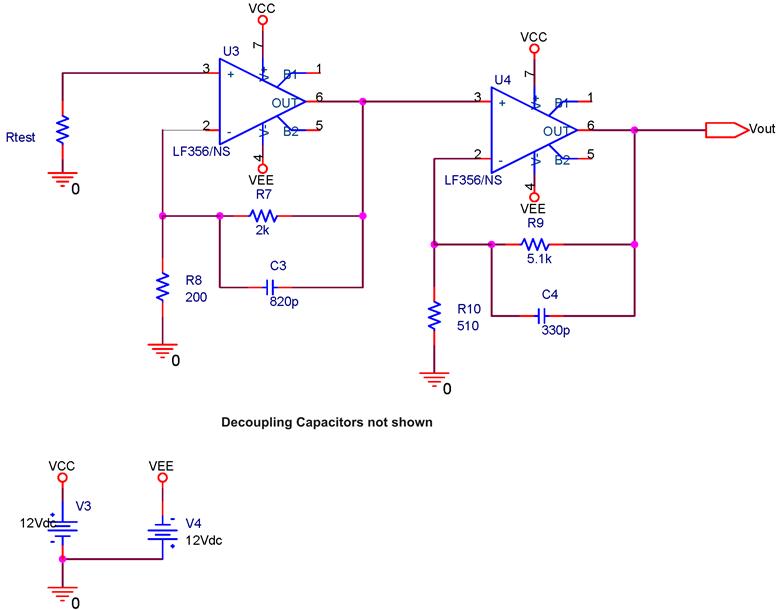
Since we measure Johnson noise over some bandwidth, we need to know the transfer function (frequency response) of the circuit. Load the program Amplifier Transfer Function.vi and connect the signals as described on the front panel. Find the transfer function of your circuit between 10Hz and 240kHz. Note that the response of the circuit is deliberately rolled off (by capacitors C3 and C4) to avoid aliasing, a topic that will be discussed at length in the next lab. Over what frequency range is your amplifier flat, and what is the gain in the flat region?
Please note that if your balance pins on the op amps are not trimmed correctly, then Vout will have a DC offset. This may cause the output voltage to exceed the maximum input of the LabView DAQ. To fix this, either trim your op amps to minimize the DC offset or manually change the input voltage range for the DAQ Assistant that reads Vout in the LabVIEW block diagram.
Now remove the voltage divider from your circuit, and connect a 100k test resistor. (Use 1% precision resistors for all of the test resistors.)
Problem 9.6
Write a LabVIEW program to measure the resistor’s noise level. As an example, you may refer to the program Find Boltzmann’s Constant.vi; however, you will not be able to open the block diagram for this program. A typical run is shown below:
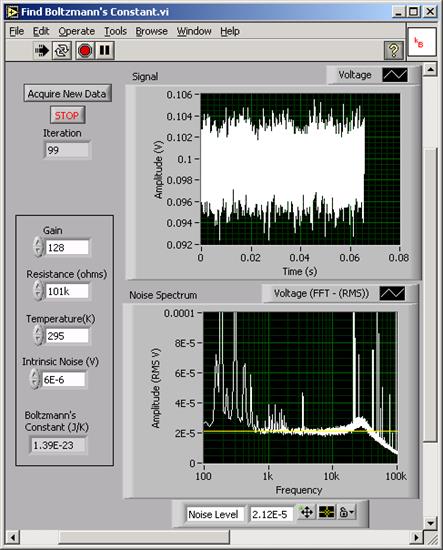
NOTE: The calculation box on the left above is NOT a required part of the exercise.
Note that the spectrum is far from flat. The many peaks come from single frequency noise sources picked up by the amplifier, the rise at low frequency is 1/F noise (the low frequency peaks are power line harmonics) and the rise and fall at high frequencies is due to variations in the gain near the roll-off of the amplifier. Nonetheless, typically there is a flat region, as indicated by the yellow cursor line. Use the amplitude of the flat section,![]() , to calculate Boltzmann’s constant. Your measurement needs to be scaled by the sampling parameters: use the formula:
, to calculate Boltzmann’s constant. Your measurement needs to be scaled by the sampling parameters: use the formula:
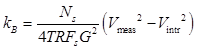
where ![]() is the number of samples (32768 in Find Boltzmann’s Constant.vi),
is the number of samples (32768 in Find Boltzmann’s Constant.vi), ![]() is the resistor temperature,
is the resistor temperature, ![]() is the resistance of the resistor under test,
is the resistance of the resistor under test, ![]() is the sampling frequency (500kHz in Find Boltzmann’s Constant.vi)
is the sampling frequency (500kHz in Find Boltzmann’s Constant.vi) ![]() is the amplifier gain in the flat region, and
is the amplifier gain in the flat region, and ![]() is the intrinsic noise level of the amplifier with
is the intrinsic noise level of the amplifier with ![]() . Use your program itself to determine
. Use your program itself to determine ![]() . (Since the intrinsic noise is independent of the Johnson Noise, the two forms of noise add in quadrature. Thus,
. (Since the intrinsic noise is independent of the Johnson Noise, the two forms of noise add in quadrature. Thus, ![]() gives the square of the noise from the resistor alone.)
gives the square of the noise from the resistor alone.)
The program Find Boltzmann’s Constant.vi uses some advanced features of LabVIEW to implement features which you are not required to duplicate. The minimum functionality you are required to duplicate includes:
- Convert the signal from the amplifier to a digital waveform. Use the DAQ Assistant express VI to read channel AI7. Configure the DAQ Assistant to read N Samples at 500kHz. The Samples To Read should be between 1000 to 100,000; the FFT routines used later prefer that the number of samples be a power of 2. Set the Voltage Range to be between about −200m and 200m. This range should be slightly greater than the size of the signal, but be warned that only certain ranges are available. The card will automatically coerce the specified range to the smallest available range that contains the specified range. The Trigger Types should be set to None.
- Display the signal on a waveform graph.
- Use the Spectral Measurements express VI to Fourier transform the incoming signal. Set the Spectral Measurement to Magnitude RMS, the Window to None, Averaging to on, the Mode to RMS, Weighting to Linear, Number of Averages to 100, and Produce Spectrum to Every iteration.
- Display the spectrum on a waveform graph.
- Incorporate all your code into a For Loop set for 100 iterations. As a reference, see the example program For loop.vi in the shared folder on the lab computers.
- Correct the labeling on all the graphs.
- Create a cursor on the Spectrum graph to display the spectral amplitude.
Hint: 1st Add graph; then Right Click on graph; then go to “Visible Items” and select “Cursor Legend”
Optional Advanced features that you might choose to program include:
8. Use a property node associated with the cursor to automatically read the spectral amplitude and use the resulting value to calculate Boltzmann’s constant. Use a Formula Node for the algebra.
- Enclose your program in a While Loop to retake the data on command. Use a Wait For Front Panel Activity node to avoid saturating your computer with null cycles. Note that this is not wired into the circuit; it works when just put inside of the While Loop.
- Use a Stacked Sequence Structure with 3 frames to enclose all the code which is inside the While Loop, leaving only the Stop Button outside the structure but inside the While Loop. This will allow more control over timing.
Hints: The Professor’s program uses these LabVIEW components.
While Loop, Stacked Sequence Structure, Case structure, For Loop, Formula Node, Property Node, Waveform Graph, Equal to Zero?, Spectral Measurements, Wait For Front Panel Activity: among others.
Have your working program signed off by the TA’s. Print a copy of the front panel (with data) for your lab report.
Problem 9.7
Calculate Boltzmann’s constant for 10k, 100k, and 1000k resistors.
Student Evaluation of Lab Report
After completeing the lab write up but before turning the lab report in, please fill out the Student Evaluation of the Lab Report.
[1] An exponentially weighted average of a sample set, ![]() , is found by computing
, is found by computing ![]() . This procedure yields a running averaging in which the most recent points are the most heavily weighted.
. This procedure yields a running averaging in which the most recent points are the most heavily weighted.
[2] In 1953, Nobelist Irving Langmuir gave a famous talk on what he called Pathological Science, but what could be described as our fantastic ability to fool ourselves. Langmuir laid out several rules for detecting pathological science:
- The magnitude of the effect is substantially independent of the intensity of the causative agent.
- The effect is of a magnitude that remains close to the limits of detectability; or, many measurements are necessary because of the very low statistical significance of the results.
- It makes claims of great accuracy.
- It puts forth fantastic theories contrary to experience.
- Criticisms are met by ad hoc excuses.
- The ratio of supporters to critics rises up to somewhere near 50 percent and then falls gradually to oblivion.
His original talk is worth reading: http://www.cs.princeton.edu/~ken/Langmuir/langmuir.htm