111A Summer 2018
University of California at Berkeley
Donald A. Glaser Physics 111A
Instrumentation Laboratory
111A Summer 2018 Syllabus
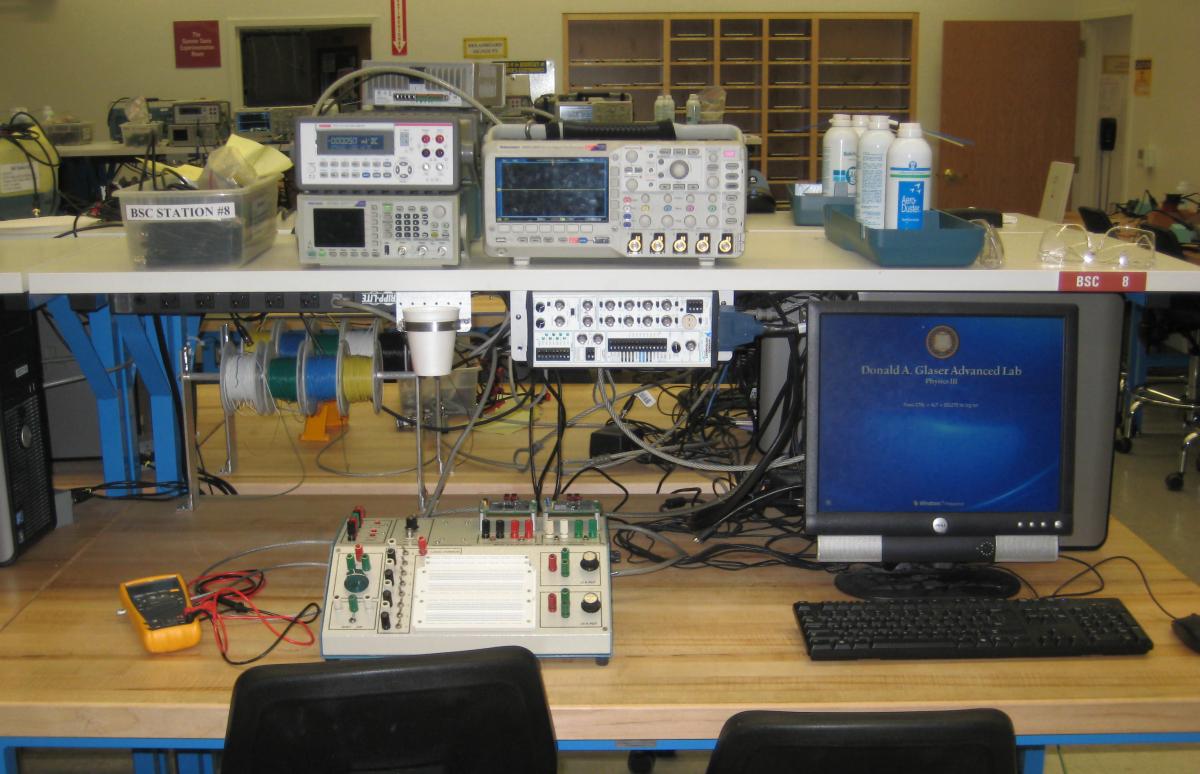
The 111A Instrumentation Laboratory Workstation
Contents:
- General Information
- Laboratory Information
- Course Checklist Before the 1st Day of Class
- Course Lectures
- Course Information
- Assignment Due Dates
- References & Lab Notebooks
- Lab Reports
- Tips for Success
General Information: Come to first (1st) day summer Lecture is in 251 LeConte Hall and starts at 12:10 PM
NOTE: Summer Class for this course moves very fast. You should not be taking any other courses during the summer!
Summer 2018 Instructor:
|
386 LeConte Hall |
Phone: 510-642-1270 |
Email: mreinsch@berkeley.edu |
Instrumentation Lab Lectures are on MTuWTh at 12:00-1:30 PM in 251 LeConte Hall
Laboratory hours are MTuWThF 2-5 PM in 282 LeConte Hall
You will need Friday lab time to complete this course.
This is a 5 day a week Laboratory course.
|
Graduate Student Instructors |
|
| TBD | TBD |
| TBD | TBD |
| TBD | TBD |
Office hours and schedules for the GSIs and professors will be posted outside 275 LeConte after the second week of classes.
111 Laboratory Staff Research Engineer 3 and 111-Lab Manager
|
Winthrop Williams |
282E LeConte |
Phone: 510-685-1164 |
Email: winthrop@berkeley.edu |
Lab Information
Laboratory Phone: 624-1937
Summer Lab hours: Monday -Friday 2-5 pm
Fall and Spring Only:
The Physics Department Colloquium is on Mondays from 4:15- 5:30 pm in 1 LeConte Hall, all students are strongly encouraged to attend. Also, tea and cookies are served (for a small fee) at 4pm every day in 375 LeConte Hall.
Course web site: Instrumentation Lab
Course Checklist
Before The 1st Day of Class
· Fill out the Signature Card, located on the class bCourses web site on the home page and press the submit button.
· Fill out the Background Survey here.
· Make sure your picture is available on the bCourses web site; If NOT bring a passport-sized photo of yourself to the first class meeting.
· Think about finding a lab partner in advance.
· Purchase your lab notebook. You'll need this for the 1st lab, which starts on the 1st day. Any sort of bound notebook is okay.
· Make sure CalCentral thinks you're enrolled in the class. You can't do the labs without access to the lab computers, and you can't get that without being enrolled.
· Read the University of California and Physics computer policy:
There will be a mandatory first class meeting in the 111-lab at 2 PM on the 1st day of classes in 282 LeConte Hall.
· We'll give you important information.
· If you need a lab partner, you'll find one.
· You'll sign up to use an experiment workstation for minimum of two afternoons a week. There are 22 workstations.
one workstation 23 for soldering, remember that workstations 20, 21, and 22 during Lab 3 week will be used for Curve Tracer labs.
· Look at the Glossary of terms.
· Check out the new digital equipment; Tektronix Scope, Keithley DMM, and the Tektronix ARB Function generator.
Lectures start the first day of classes.
· Lectures are 12PM to 1:30PM monday-Thursday starting the first (1st) day of classes.
· You should have done the reading assignment by the start of lecture, including the first one.
Before you start each lab
· Download the manual for each lab from the Lab Assignments tab above.
· Read it and do the pre-lab questions before coming to the lab.
· Before your first lab, watch the Introduction videos on the Instrumentation web site.
Instrumentation Lab COURSE INFORMATION
Welcome to the Physics 111 Lab—Instrumentation Lab (Previously BSC) course! During a regular semester, the Instrumentation Lab is a Ten-week course that requires five (5), 3-hour afternoons of lab time per week, 1.5-hour lectures four (4) a week, on average, in addition to outside reading, analysis and writing. The course covers basic electronics (filters, diodes, transistors, op-amps, analog & digital circuits, D/A conversion, and LabView Programming, etc.) and measurement techniques with an approved Final Project of your choice. It will also teach you how to use equipment found in a typical physics research laboratory and how to write scientific reports.
Before taking advanced laboratory section of the 111 Lab, you must take Instrumentation Lab (physics 111A) unless you have taken an equivalent electronic course (e.g. from the EECS department or physics 111 professor approval).
Some students find that the 3-unit Instrumentation course takes more time. This is an upper division physics Lab course and moves very quickly! Students completing Instrumentation Lab last semester estimated that the course takes between 12 and 15 hours each week total. Please plan your time accordingly.
Course Structure:
The course is organized around the lab assignments. You'll be doing them continuously. Each lab has a write-up that you work through with a partner. See below for more hints on how to do that and how to get the most out of it. At the end of each lab, there's an assignment to be turned in. Some of these are formal lab reports, some are informal (shorter reports), and sometimes you just hand in a copy of your lab notebook. Except for notebook copies, all materials handed in must be typed.
Pre-labs must be done in advance. They should be at the front of that week's section in your lab notebook. You need to show them to a GSI and get them signed off before the start of your reserved lab period.
Assignments are due by 11:59 pm on the due date online uploaded to Bcourses.
Late assignments will be subject to a penalty per day late. Extending your assignment due dates without penalty would require exceptional circumstances. On those occasions, approval must be in advance and via email from the Professor and must be included in your report. Past one week, if the lab has already been graded it will receive a grade of 'F' equal to zero. You must still submit all assignments in order to pass this course.
Students must complete all required work and turn it into the 111 Lab in order to pass the course. Any missing work will result in a final grade of "F" for the semester. You must turn in all labs, even if they're late, to pass this course.
Plagiarism will result in a final grade of "F" for the course. For guidelines on working with a lab partner, please see "On Working Together" later in this manual.
The last assignment is a project of your own development. We'll provide more information on that as the course goes along. You'll submit a proposal, discuss it with the instructor, then build and debug your project. At the end of the course, you'll demonstrate it and write a typed written final lab report.
Computers in the Physics 111 Lab:
· Read the University of California computer policy
You must be enrolled in the course and have a valid CalNet ID Login name to log into the computers. Save all of your data and files to the DeskTop or My Documents Folder; everything else will not be saved or backed up. You also want to save your files & data to your own 8GB USB thumb drive. Experiment and equipment information is located on the 111-Lab Share folder on your network drive from within the 111-Lab in “My Computer” on each computer or from the Physics 111-Lab Library site.
Academic Honesty
Both the University and the 111 Lab staff take the subject of academic honesty very seriously. Please make sure you understand completely the following and ask questions if ever in doubt:
"All data that you present in your reports must be your own. All written work that you submit, except for acknowledged quotations, is to be in your own words. Work copied from a book, from another student's report, or from any other source will, under University rules, earn the student a grade of 'F' for the semester, and possible disciplinary action by the Student Conduct Committee."
Note on Working Together
Research in physics is facilitated by close cooperation and collaboration among those involved. Indeed, if scientists did not share results and argue over interpretations, new discoveries and insights would be much fewer and further between. You will find in the 111 Lab that you learn a great deal from working and talking with your classmates, especially your lab partner. However, as in other courses, each student will be given a grade based solely on his or her individual achievements. Each student must turn in his/her own lab report, in his/her own words. This requirement is not intended to reduce cooperation or discussion in or out of the lab. On the contrary, we encourage you to discuss your results with other students and to try to make sense of them together. The final product, however, must be your own work.
What is not acceptable? In general, use common sense. Raw data and good ideas should be shared with your classmates, but text, analysis, graphs, figures, and derivations of equations should be completed alone. If you have any questions, please ask the lab staff.
In summary, each student must do his or her own work. Failure to do so will result in an "F" for the course.
Course Material Fee
Physics 111A Instrumentation students are assessed a Course Materials and Service Fee (CMSF) of $175 to cover the cost of expendable supplies and materials used in the course. These fees are collected after the fifth (5th) week of classes and will be included in each students’ CARS (Campus Accounts Receivables System) statement. Income from the CMFS is kept in a separate account that is used only for the purchase of supplies and expendable materials for Physics 111. Equipment purchase and repair, computers, and staff salaries are paid for by the Physics Department, not by student CMSF.
You can sign out a VB-108 type breadboard and keep it for your own use from the back wall of the lab. That lets you build a circuit one day, and still work on later days. You can keep the breadboard in a slot in the lab (recommended; pieces tend to fall out when you transport them) or take it with you.
Assignment Due Dates: Turn assignments into Physics 111A Bcourses online, see due dates below, by 11:59 PM.
|
LAB # |
Lab Title |
Lab Start Date |
Report Due Date |
Assignment |
|
1 |
Introductory & Linear Circuits I (longer lab) |
Mon. June 4 |
Mon. June 11 |
Full Report for Full Grading online turnin through Bcourses 100 points
|
|
2 |
Linear Circuits II |
Friday June 8 |
Friday June 15 |
Full Report |
|
3 |
Semiconductor Diodes |
Thursday June 14 |
Wed. June 20 |
Full Report |
|
4 |
JFET Circuits I |
Tues. June 19 |
Mon. June 25 |
Full Report |
|
5 |
JFET Circuits II |
Friday June 22 |
Friday June 29 |
Full Report |
|
6 |
Op Amps I |
Thursday June 28 |
Thurs. July 5 |
Full Report |
|
7 |
Op Amps II (longer lab) |
Tuesday July 3 |
Thursday July 12 |
Full Report |
|
8 |
Op Amps III |
Wednesday July 11 |
Wed. July 18 |
Full Report |
|
9 |
LabView Programming |
Tuesday July 17 |
Monday July 23 |
Full Report (we will provide special instructions) |
|
10 |
ADC’s & DAC’s |
Thursday July 19 |
Friday July 27 |
Full Report |
|
11 |
Feedback Control |
Thurs. July 26 |
Friday Aug. 3 |
Full Report |
|
12 |
Final Project *** |
Wednesday Aug. 1 |
Saturday August 11** |
Final Full Report for Full Grading 330 Pts |
Notes: 1) ALL lab assignments must be turned in to pass the class.
2) Scoring a zero (perhaps by turning in a short report late) means lost points, but not turning in a lab
means automatic F for the course.
3) You shouldn't waste precious lab time on lab write-ups. Get it done outside of class.
4) Exceptions may be made for extraordinary circumstances at the Professor's discretion. This is much more likely
if you contact him before the deadline rather than after.
*** Final Project NOTE: Submit online a 2 page or less proposal for your final project with a Circuit Diagrams and Block Diagrams on or before THURSDAY July 19th.
Your professor will contact you to approve your proposal, request clarification, or suggest improvements. Each group will have the opportunity to meet with the professor to develop and refine your proposed project. These meetings can be arranged via email or in person. Revised proposals are due on July 23. The final project proposal is the only instance in this course where you will submit identical work. For both the initial and revised proposals, please coordinate with your partner to submit duplicate proposals that clearly display your project title and lab partner's name.
Note: Purchase your final project parts ahead of time including any other breadboards you will need. Ask professor if you need help. Some Sources include;
NOTE: You can check out and keep the portable breadboards, VB-106 or VB-108, from the 111-Lab for yourself ( Only one each please)
· Mouser.com, Digi-key Electronics, Newark Electronics, Jameco, Al Lashers in Berkeley at 510-843-5915, etc;
Project Ideas: See the Lab 12 Manual
· Ask the GSIs or Professor for others if needed. Plan ahead!
**Inspection of physical Final Projects will be on or before the last four days of classes. See Professor for Details.
=>Every student must complete their own final lab write-up. (Due date and submission method TBD by professor) **
Final Project Information:
The last assignment is a project of your own development. We'll provide more information on that as the
course goes along. You'll submit a proposal, revise as needed, then build and debug your project. At the
end of the course, you'll demonstrate it and submit a written final lab report.
Proposal Process:
• Turn in a 2 page or less proposal for your final project with a block diagram and schematics of key
parts. The idea is to focus on what you’re going to build, and show you’ve started thinking about how to build it.
•The professor will approve your final project proposals or engage you in a dialogue about how to improve them if needed.
There should be only one proposal per lab team. You will write it together, with everybody’s name on it.
Note: Purchase your final project parts ahead of time including any other breadboards you will need. Some
Sources include Mouser.com, Digi-key Electronics, Newark Electronics, Jameco, Al Lashers in Berkeley at
510-843-5915, etc. Ask the GSIs, Don, or the Instructor for others if needed. Plan ahead!
End-of-Semester Process:
The lab is open through the last day of class, Friday August 10. Lab hours will be extended as needed see Professor. No work will be allowed in the 111 lab rooms after Friday. Please attempt to complete your project early, in case of unexpected delays.
There are two parts to the end of semester process.
- Evaluation: Your project will be evaluated in lab during the August 7th week from Monday 8/6/2017 to Friday 8/10/2017. You will need to demonstrate your project to the Professor. There is no sign up for this process and projects will be evaluated in the order that they are declared complete. This process can get busy on Friday, so please get your project checked out earlier if possible.
This checkout procedure is similar to being quizzed about a lab section to get a sign off, except it will be more thorough. You should be ready to discuss the details of the design and performance of your project. All team members must be there at the time the project is signed off. It will be very helpful if you have a complete schematic for your circuit which you can refer to in this discussion.
- Final Report submission: The final lab report must be submitted online at Bcourses by Saturday 8/11/2017 by 11:59PM. You will individually write and submit your own final lab write-ups just as for the other lab reports. Please make sure to include the name of your lab partner and project at top of the front page of your report. The final report should be relatively short and concise. It should contain an introduction describing the goals of your project, a section describing the design and execution including metrics of performance, and finally a set of conclusions. If the performance of your proposal was less than optimal, please attempt to discuss how it could be improved. Please include a complete circuit schematic and a block diagram of any Labview code with your report.
Required text:
Horowitz and Hill, The Art of Electronics, 2nd Ed. (Cambridge) see library site
3rd edition new purchase it
Recommended for Reference:
Hayes and Horowitz, Student Manual for the Art of Electronics, (Cambridge)
Sedra & Smith, Microelectronic Circuits, 5th Ed. (Oxford University Press)
Other references: Physics 111-Library Site
Other useful texts (on reserve in the Physics Department Library)
Senturia & Wedlock, Electronic Circuits and Applications (Wiley)
Schwarz & Oldham, Electrical Engineering: An Introduction (Saunders)
Millman & Grabel, Microelectronics, 2nd Ed. (McGraw Hill)
Required Lab Notebook: any bound notebook
You are required to keep a lab notebook for this course. Remember that your lab book should be a self-contained, stand-alone description of your laboratory experiments: when you look it over, say a year from now as you fondly remember your undergraduate days, it should make sense to you!
NOTE: You will probably need more than one of these lab books.
- To do calculations use MatLab or similar
· When writing in your Instrumentation Lab Notebook:
· Use a pen. NO PENCILS PLEASE!
· Give the following information at the top of the lab write-up:
Your name Date
Your partner's name Station number
Week number and title of lab
· Record all of your data and observations in your notebook; don't use “scratch paper.”
· Record the settings and conditions under which the data was taken.
· Be as neat as possible. (Sections that cannot be EASILY read will not be graded.)
· Line out with a single line (e.g. Ooops) anything written in error (data or text).
· Use a single large "X" to indicate any sections that you do not wish to be read.
· Use a straight edge to draw lines that are supposed to be straight (graph axes, column lines, etc.).
· Attach any loose sheets (e.g. semi-log graph paper) with your assignment.
· Pre-lab questions must be signed off by TA's by each Friday
· Your logbook should show a clear understanding of the Lab and the work that you did in the laboratory. It should not be longwinded, it should not include all possible details, and it should not be a scattergun approach.
· P/M/F Graded labs: please just tear out the copy pages from your LAB NOTEBOOK for the Lab and turn them in. Do not include introduction or conclusion. DO include Pre-Lab Questions, in Lab Work and Diagrams, etc.
In the lab
After the Pre-lab, you take data for that week's lab. You then present that in your report. Make sure that you:
· number the sections of your data so they correspond to the numbers in the lab manual.
· make tables clear and neat, and be sure to always label columns and include units and some estimate of uncertainties.
· answer questions posed in the "In the lab" section in the same section as your data.
· include circuit diagrams and figures showing the set-up. Any circuits analyzed, built or used should be diagrammed. If you have a digital camera, take lots of pictures, but you should still make diagrams in your lab notebook.
Signatures
There are places marked in the lab where you are supposed to get a GSI signature. These are meant to let the GSIs check up on your progress throughout the lab. Therefore, you need to get your lab questions signed as you complete them. GSIs expect to see your circuits and signals so we can test them, not just your recordings in your notebook. Also, signatures are not an answer, they are just an acknowledgement that you completed the section. Explanations are still required.
Please start each lab with a section for the GSIs to sign all in one place.
Questions
Each lab contains “Questions” which refer to the data which you have taken in lab. Please number your answers. Extra information is fine, but don't bury your answer where it can't be found. Clearly set off the final results (e.g., box numerical answers) and, of course, always include units and error estimates. Compare your results with your expectations whenever possible.
You may wish to complete some of the questions while in the lab, rather than waiting until later (e.g. calculating amplifier gains, making plots, etc.). This is often a good idea but please indicate where you are completing one of the “Questions” by labeling it.
Graphs, tables and scope traces
Data plots and tables are often the easiest ways to convey information. All graphs must have a title and labeled axes showing quantities and units. Make all graphs large enough so that they may be easily understood. Graph families of curves or related functions on a single set of axes. Error bars are almost always required. Number all figures and graphs and include legends. If there are a lot of points, or if you need to fit the data to a theoretical curve, it is usually best to use a computer-plotting program to prepare the graph.
Axes should also be labeled on scope trace sketches, as should the heights and widths of its features. Basically, a sketch should contain enough information so that it can be used to reconstruct what is important in a trace. You may not know at the time what is important, so you’ll have to use your best judgment. It’s usually best to err on the side of completeness.
Uncertainties (errors)
As this class is focused on getting experience building circuits and analyzing circuits, you do not need to do formal error analysis. Still, this is a physics lab, and some attention must be paid to the uncertainties in your data and analysis. Uncertainty estimates come from consideration of the measurement itself, not from the comparison of theory and experiment. In each case you want to ask yourself the following two questions:
· “What is the range of values for my measurement over which I can’t reliably state that one answer is better than the others?” This is roughly the statistical uncertainty (error), and it can always be easily assigned.
· “By how much might I actually be measuring something different from what I’m intending?” This is roughly the systematic uncertainty (error), and it may require more thought to quantify.
Only the dominant source or sources of error are important. One can only make a reasonable comparison between theory and experiment if the uncertainty in the result is known.
Acknowledgments and References
Indicate who your partner is and indicate which parts of the lab you did together and which you did separately. Reference any outside sources you used (text, friends, etc.); give credit where credit is due.
Supplementary problems
If there are any then the points for these are kept track of separately from the rest of the lab. In cases where your grade is just below a grading boundary, having done this extra work may boost you up to the next grade. The supplementary problems are often among the most interesting exercises, and they are not in general more difficult. If you do not have time to do them, you should at least read them over.
Level
Your report should be type written at a level such that one of your classmates with the level of understanding that you had before you started the Lab could pick up your report and understand what you did, what electronics is illustrated, and how good your results are.
TIPS FOR SUCCESS
· Get started early. Reports always take longer to complete than one expects.
· During the lab session, make estimates for measured quantities to see if what you are doing makes sense. This will save you return trips to the lab!
· Be neat. Understanding the material is only half your task. Your presentation must be clear enough and easy enough to read that the reader can be convinced of your mastery.
· Watch your units. Confirm that measured quantities have the appropriate units. A unit-less answer is meaningless.
· Define variables in equations. What is obvious to you may not be to the reader.
· Locate experimental uncertainty. Nothing elaborate is expected but be aware that errors (uncertainties) do exist. Identify sources and estimate magnitudes of error.
· Proofread. Check for both simple and conceptual typos. Compare your results to theoretical predictions and to the component specifications. Order of magnitude estimates are often sufficient for checking results.
· Ask questions! The only dumb questions are the ones that aren't asked.
· Don't waste time in the lab. Time management will be crucial in the lab and if you are getting ahead, stay ahead. If you are done with the lab 2 hours early, start the next one. Holidays and sickness can throw you off permanently if you don't take advantage of all the time you have.
HELPFUL HINTS FROM GSI's: How to ace your lab report.
-
You need to get a signature from your GSI for the Pre-Lab questions before you can get a signature for any questions marked with a pen.
-
You also need to get GSI's to sign the problems that are marked with a pen.
-
On your Lab report, you need to attach an original or copy of these signatures.
-
Without these signatures, you will not get credit for these problems.
-
Try to do all the problems in the Lab write-up.
-
GSI's are not going to grade all of the problems.
Part of the problem sets will be chosen for grading. You will not know in advance which problems are graded or not.
Final Advice: Here are some comments that will make your 111 Instrumentation Lab experience much easier and enjoyable for you (and less time consuming). First of all, do not simply think you do not have homework because this class is a lab.
· Before the lab: It will help you tremendously if you read and understand the lab write-up before you come in to start the lab. Look over all the questions, including the pre-lab questions, and determine anything you do not understand. This would also be a good time to write your introduction since now you know what the lab is about.
· In the lab: When you come in on your first day, you can discuss the pre-lab questions with the GSIs and answer them. This would also be a good time to discuss anything you are not clear about. In addition, try to follow directions; you could lose points by simply not answering the questions fully. Finally, if you have any doubts about anything, please ask a GSI.
How to Use the Lab Write-Ups
Read the write-ups before coming to lecture. The labs are divided into four sections: the Pre-lab questions, which should be completed before coming to the 111-Lab, Background materials, In Lab work, and Analysis. Not all labs have all sections. Be sure you understand the background material and have answered all the pre-lab questions before you come to class. The Analysis questions can be answered at home after you finish the labs. Ask questions if you are confused…electronics is a difficult subject that is new to most students. Don’t be dismayed if some of the other students seem to be faster than you; probably they just have some previous experience.
The write-ups are available from the 111-Lab Instrumentation Lab WEB site at:
http://insrtumentationlab.berkeley.edu
Circuit schematics and some analysis programs can also be downloaded from the site.
The lab write-ups are not intended to be used on their own. Make sure you read the assigned reading.
Take a quick look at the glossary before you begin this course. There are too many terms there for you to memorize their meanings all at once, but knowing which terms are defined will help you later in the course.
The labs contain several ideograms:
 |
Means do this before you come to the Physics Instrumentation Lab. |
 |
This means that you have to have the results of the indicated problem checked and signed off by a T.A. |
 |
Indicates that the adjacent schematic has a Multisim model. |
| * | Denotes an extra credit problem. |
Credits
The Instrumentation Laboratory is the first semester of the Physics Departments' advanced laboratory class, Physics 111, required for all physics majors. The class starts with 11 labs, and ends with a final design project. The labs progress from basic instrumentation to frequency dependent components, transistors, op amps, and computerized data acquistion and control. Each lab takes approximately two afternoons to complete; approximately one lab is due each week.
Many faculty and staff members have worked on the lab experiments and manual, including Joel Fajans, Bruce Birkett, Sumner Davis, Roger Falcone, Kam Biu Luk, David Weiss, Bob Jacobsen, Don Orlando, Howard Shugart, Sudeep Dutta, Damon Brown, Nate Belmore, and the Electronic Shop Staff.
In 1996, I started the major revision on the labs and the manual; I am grateful for the patience of the students during the semesters that the lab was being revised: Joel Fajans [(Revision Summer ’02, Jim Siegrist), (Revision Spring '14, Bob Jacobsen), (Revision Spring '16, Joel Fajans)
Outline of Lectures
I. Introduction & Linear Circuits I (Lab 1)
A. Resistors and Kirchoff’s Laws
B. Thevenin’s Theorem
II. Linear Circuits II (Lab 2
A. Capacitors and inductors
B. Fourier analysis
C. Linear circuits in the time domain
D. Resonant circuits
III. Semiconductor Diodes (Lab 3)
A. Non-linear impedance
B. The physics of diodes
C. Load lines
D. Rectifiers
E. Special Diodes (Zener Diodes, LEDs, Photodiodes and Laser Diodes)
IV. Transistors (Labs 4 & 5)
A. Types of Transistors
B. The transconductance model
C. The physics of JFETs
D. Self-biasing
E. Voltage amplifiers
F. Differential amplifiers
V. Op-amps (Labs 6, 7, 8)
A. What is an op-amp?
B. Op-amp golden rules
C. Op-amp amplifiers
D. More on feedback
E. Oscillators, filters and other devices
F. Real op-amps
G. Noise
H. Bipolar junctions transistors
VI. LabView Programming (Labs 9, 10, 11)
What is LabView ADC’s and DAC’s using LabView Feedback Control using LabView and computers VII. Final Projects of your choice with approval (Lab 12)VIII. Digital Electronics (Supplemental Information)No Lecture on Digital Circuit but information is still online for your viewing.
A. Digital: what and why?
B. Digital logic and gates, Timers
C. Flip-flops: Counters, and oscillators
D. Analog-Digital ConvertersTop of Page
|
some important concepts Linear Circuits: voltage divider; black box; input and output impedance; transfer functions; Bode plots; low pass filter; high pass filter; time-domain analysis; phasor diagrams; quality factor. Diodes: non-linear impedance; forward and reverse biasing; frequency doubling; load lines. Transistors: transconductance; small-signal models; source resistance; saturation regime; linear regime; current source; follower; how gain is achieved; common-mode vs. differential gain. Op-amps: negative feedback; ideal op-amps; hysteresis; filter transition region; filter rolloff; bootstrapping; real op-amps; white noise; shot noise; flicker noise. LabView: LabView Interface Programming used in Research Laboratories. Control of Equipment & taking of data. ADC vs. DAC Circuits noise immunity; universal gate; logic family; bistability; buses; digital counting; astable vs. monostable 555; Shannon’s sampling theorem. |